|
I've heard a lot about people doing this, and I've drilled a few out myself. But it never helped stop nozzle drip on Qjet carbs for me. I ended up going to a Holley type carb both times. It seems like it may work with a mild cam and dual plane intake- but once the cam timing and cubic inches get too big, what to do ??
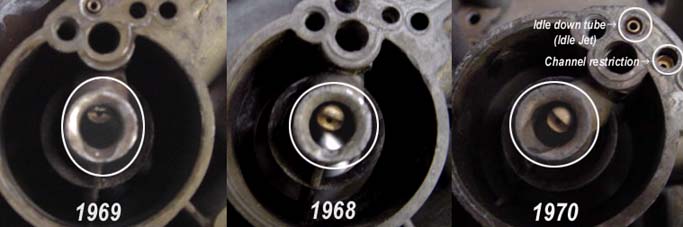
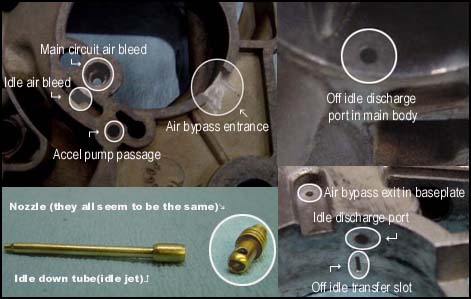
I think there are other factors involved in idle quality and the main circuit the "drizzle" that just the idle emulsion tube orifice and the channel restriction tube orifices. With my 78 400 and a 228@0.050 cam the stock 78 carb had the "drizzle" from kicking in the main circuits.throw a 73 carb on it and presto no drizzle and better idle. Guess what, when measuring the idle tubes and CRO tubes they are also identical. Now the idle bleed holes at the top of the main body are totally different sizes. Carb Shop drilled out the idle tubes an exact model # carb and it didn't idle as good as that stock 73one. I think the idle and main bleed holes must factor in there too. Carb Shop has some tubes that you tap the main body and can pull them out to redrill the bottom orifice easier. Any of you carb experts have an opinion?? The main cause of nozzle drip, when not related to float level being to high, is to much air moving through the venturi. Since the Qjet has such an efficient booster design, it doesn't take much air flow to create a low pressure area, and start pulling fuel through the main system. The root causes of this are three fold: First, and most likely, the butterflies are set at too high an angle in an attempt to get the idle speed up. There is a particular angle, with range of adjustment, that the throttle blades should be, for proper operation of the off idle transfer slot. The factory has included something you won't find on Holleys...an air bypass. This air bypass takes air from next to the venturi, through two slots(rt & left side) in the air horn. The air travels down through the main body, and exits through a calibrated, factory drilled hole on each side of the base plate, just below the butterflies. These holes vary in size dramatically from the factory, depending on the size of the camshaft. To run a large cam (245 or more at .050", mine is 254intake) you need to drill these orifices to .100-.125". Once done the throttle blades can be moved back to there proper position, and still retain a good idle speed. But now, the air goes around the venturis. Second, and this is related to the first, as well as related to your question about the down tubes. The idle circuit needs to have enough fuel getting to it(as per idle down tubes and channel restriction). The emulsification(mixing air with the fuel) of the mixture, needs to be appropriate for the engine(as per idle air bleed & siphon break). And the idle discharge port(where the idle adjust needles are) needs to be large enough to provide the total quantity of idle mixture(enough to go with the extra air from the enlarged bypass), while still allowing for a range of adjustment by turning of the needle screws. When these things are correct, the engine will idle with the butterflies in the correct position, with vacuum readings as low as 4 inches. And it should not drip. But just the idle down tubes alone are not enough. Third, and this one is for tough problem that just won't go away. Various carbs have the brass nozzle pressed in the the main body at different depths. There does not seem to be any rhyme or reason to this. For the picture, I went to the garage and grabbed three different cores off the floor at random. All Poncho cores. Each one has the nozzle pressed in a different amount. I have found, that when the nozzle sticks farther into the air stream, it is far more sensitive to the nozzle drip problem. Tapping them in a little can solve the problem. I have not noticed a change in performance after an adjustment. When the nozzle sticks into the airstream, it takes up space in the venturi, this means that less volume exists in the area surrounding it. The definition of the venturi effect, is that as the air accelerates through the small area to meet up with the air flowing around the outside of the venturi, it will create a low pressure area (booster signal), this allows the atmospheric pressure in the float bowl, to push fuel through the jets, and out the nozzle into the airstream. So, by moving the nozzle farther in, you decrease the booster signal a little, and the drip should go away...assuming all the other factors are taken care of as well. I circled the idle down tube location in the image. .029-.032" is the stock size for most low perf Poncho Qjets. .032"-.037" is what I find in higher perf. versions. The idle air bleeds vary dramatically from Chev to Cad to Buick to Ponchos. I just had a factory 455HO 800cfm single boost ring carb that I built for a friend: Idle jets=.037", Idle air bleed=.059", channel feed restriction=.057". Just finished modifying a 750cfm, 67 Firebird 400 carb. Idles wonderful in gear at 750rpm with a 276@.020" 245@.050"int cam. Idle jet(down tube)=.037", idle air bleed=.042", Channel restriction=.063, Idle discharge ports=.101", air bypass=.110" I know this sounds complicated, but every carb has these same circuits. In a Holley, they are all the strange looking holes and passages in the metering block. In Webers, its the various adjustable jets and emulsion tubes. Once you understand how these circuits work, all carbs are relatively easy to work on, it just takes time and patience. The Qjet is called names, because the factory had to calibrate for hundreds of applications, and most were not performance. So they do not work for performance without drilling a couple holes. Big deal. A word about the channel restriction. Once the fuel comes up the idle down tube, in a quantity dictated by the orifice size, it is mixed(emulsified) at the top, with air from the idle air bleed. Then, the total quantity of emulsified mixture is limited by the size of the channel restriction, then delivered first to the Off-idle port(little hole just above butterflies, but located in the main body), then to the off idle tranfer slot(directly above idle discharge port, located in baseplate), then regulated by the position of the idle adjustment screws, and finally discharged into the manifold, just below the butterflies. If the channel restriction is to small, you can get an off idle stumble, as well as not enough adjustment range in the idle screws. If it is to large, the engine will have sluggish throttle response and fuel economy could be affected. There is of course more, but I'm tired. Did that answer the question? Karl
Karl, Thanks much !! I obviously have had problem #3, the one that just doesn't "go away". The engine combos were as follows: All on 469" engines. One has a tunnel ram on RA V heads, solid cam, 250 duration at .050". Another has a Victor on E-heads, roller cam, 244 duration at .050". The third engine had an Edel. Torker II intake, stock 5C heads, 225 duration hydraulic cam. I never experienced this problem until I started building the 455 + .060" Hmmmmm. I've been through the idle tube, idle air bypass, and throttle plate procedure. Thanks for the recap. The info about tapping the discharge nozzle in sounds like it's worth a try. I was actually thinking about removing one booster venturi, to reduce the signal at idle. Didn't Pontiac do just that on the 455HO carbs in '71-'72 ?? Could they have removed the booster ring to reduce the signal, and eliminate nozzle drip ?? I have tried moving a lot of air through the idle air bypass. In these applications, idle quality suffered. With raw air pouring into the intake not mixed with fuel, the engines acted like they just had a vacuum leak. While the idle air bypass works in theory, it's not mixing with fuel efficiently, the atomization/vaporization is not optimal. Question: If your settings have opened the idle tubes up to .037" per you examples, it seems like the main jet/rod combo would then become the restriction at idle. If running a jet/rod combo of around .030" difference at idle, that would then become the "choke" in the idle circuit ?? Ex: 72 jet, 42 metering rod, .030" metering at idle- as compared to a .037" idle tube size, and even larger channel restrictions. All idle fuel goes through the main jets first, then passes through the idle tubes and channel restrictions further "downstream". (??)
Great info!!When those butterflies get kicked open more as you said you get out of just the idle circuits and start pulling from the main circuit. The bleed holes I mentioned are in the upper air horn body over the idle tubes. Just like Holleys have main and idle bleeds(now replacable in the HP series) The Q jets seem to have similar bleeds. I can't really figure out why one carb will have two in one spot and another carb just one. They are various sizes. Another "good" thing the Q jets have is a big internal air bypass usually located on either side of the fuel bowl in the main body. This allows the air to move in the engine and not go past those main boosters. Your thinking in the right direction, but your math needs help. It is the metering area that is important. The area of the jet, less the area of the rod. I run a 74 jet, and 47b rod. Area=Pi(r^2) (PIE,Radius,Squared) .070 jet area=3.14159*(.035*.035)=.00385" Metering area=.00385-.00126=.00259" .037" idle jet area=3.14159*(.0185*.0185)=.00108" So, as you can see, the amount of fuel that can flow through the jet M/Rod interface is almost 2.5 times that of the idle jet. It is not a restriction.(.00259/.00108=2.4) I have known Pete McCarthy for a few years from the Tiger Run up here in the NW. Although a sharp guy, I don't know what he was talking about in his S/Stock book when he mentions jets & rod combo's for rich and lean idles. (if thats where you got that from). The HO carb, as I understand it, was designed that way as another way to increase the cfm to 800. It does not have the larger dia. main body as other 800's do. However, perhaps nozzle drip was a factor in the decision. I know what you are talking about when the air bypass gets large. I used to feel the same way when I first began mofifying these components. But keep in mind two things. I have drilled some pretty large holes, and then had to drill a couple in the butterflies as well for some applications, when everything is right, they idle fine. Second, a properly emulsified mixture will vaporize quite nicely. So the air bleed to idle jet size is very important. A couple of hints to try. I cut a slot accross the face of my idle discharge port that connects with the disharge of the air bypass. I was hoping this would let any fuel that was "dribbling" (liquifying as opposed to vaporizing) out of the discharge port recombine with the air coming from the bypass. It seemed to make a minor improvement, but I didn't write my mom to tell her. Here is a picture... Another, some carbs have a hot idle compensator in the rear, just above the power brake line port(on carbs with power brake ports, not all have them). If this is not working right, you will indeed have a huge vacuum leak. Tap and plug with 1/8" pipe thread and plug. I recommend this for every carb that has one. Back to the nozzle drip. Another thing to try, is a slight increase(couple thou) of the main circuit air bleed. This is like having a hole in a straw, and will need a stronger booster signal to overcome. However, it has an effect on the entire fuel curve, and may require a whole jetting loop be done to reaquire your original fuel curve. Here is another detail pic for the unfamiliar: I have figured a simple way to put a four hole idle circuit in a Qjet, but have not had time to try it yet. I'll post if it works. Later Karl
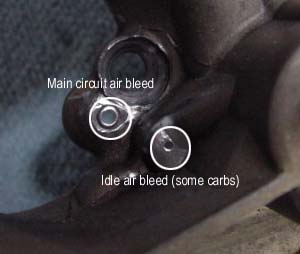
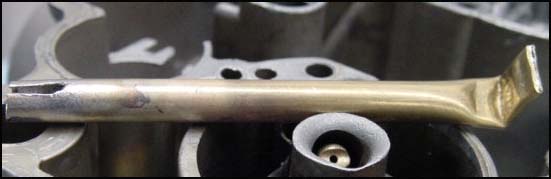
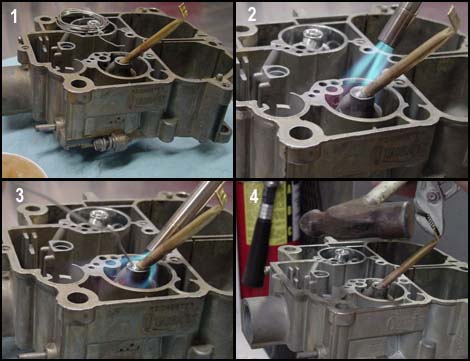
Ken K: To be honest, I never pay attention. If there is a difference, I've never taken notice. Perhaps I will start to pay attention. The visible part of the nozzle has a dia of .182". All you need to tap it in a little, is a piece of brass tubing with an inside dia. slighter larger. Here is a pic of the air bleed detail from the top. The idle air bleed is not always in this location for all Qjets. All the early pontiacs seem to be this way. My 800 cfm Buick main bodies that I usually use for my race carbs, do not have this air bleed at all. It is located in the main body, just above the channel resriction, and is quite large. For improved idle with large cam, I plug the factory Buick bleed, and drill one like the Pontiac. Big improvements in idle quality. If your airbleed is larger than you would like, or you just want to try a smaller one, just peen the factory one shut with a punch and redrill it. The material is soft and will pinch closed easily. Fortunately, most people don't have to go this far to get Qjets to work. Zedo and I are running big inch, large port, large cam, large plenum intake, high lift set ups that challenge most any carb. The key is understanding how the carb works, then it is fun to tinker. If you are the type person who does not like to tinker, or has not the time and just wants to race, then this type of carb is not for you, unless you know someone like me. However, many cars need to have there Holleys and Demons reworked and tuned for max perf on hard to tune race engines. I have had to do it many times, just 2 weeks ago in a 440 Road Runner that runs mid twelves. His brother used an out of the box Holley 830 Annular discharge on a similar car with great results. But the same carb on my customer fouled plugs and had other probs. It just depends on so many things... Some get lucky with "out of the box" perf. But I have never been able to rely on luck. If it wasn't for bad luck, I wouldn't have no luck at all... Karl First, I want all you guys to know that I do have a life...all these pictures are for my new and improved website. This topic just gave me a good reason to put the finishing touches on some of them. Also, I have a very strong background in graphic design, digital photography, analog and digital video editing, and multimedia development. So, it only takes me a few minutes to make these photo collages, and, it helps that I have trick equipment and software laying around the house. In fact, this spring I produced a promotional cd for Bob Gilbertson's FMTV Top Fuel funny car team. This kind of stuff is fun for me. That said, back to carbs. Zedo, you remove the nozzles in the following manner: Get a piece of brass tubing that slides over the end of the nozzle. Cut a slot in the end so that you can flow solder into it. Now, get out your trusty silver solder, acid flux, and propane torch. Flux up the inside of the tubing, slide the tube over the end of the nozzle, heat the end, and flow solder through the slot onto the nozzle to tubing interface. As per the picture, take a pair of channel locks, and lightly tap the nozzle out. Reheat the tubing until the nozzle falls out of the end of the tube. Put the nozzle into an electric drill, heat it one more time, spin the drill...and the solder will come flinging off...of course, watch your aim unless you like pain. Use a wire wheel to polish off the residual solder, and now your ready to clean up and polish your venturis. Karl
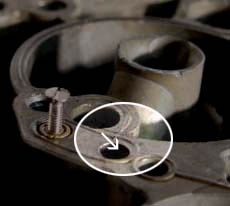
A picture is worth a thousand words. 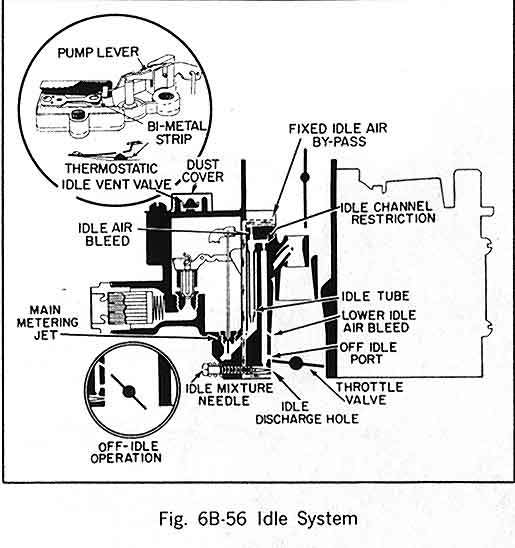 As you can see from the picture the idle circuit gets its fuel from the main jets, therefore any change in main jets will also affect the idle circuit, hence the operation of the power piston and metering rods. Zedo: I'm not really sure what to say, I have been changing jets and metering rods for years, and never noticed an effect on idle quality. Although TinInjun's diagram shows in detail what we were talking about above, the fact remains that the idle down tube, even with a lean jet and metering rod, is still going to be half the metering area of the jet/MRod area. There should be more than enough fuel available for the idle circuit to work, independent of the jets. Now, if you were having trouble with nozzle drip, then the jets would be important, because part of your idle mixture would be coming from the main system. With my 800 Buick carb on my Victor manifold, I had slight nozzle drip until I opened the idle down tube from .035 to .040". Also, I increased the size of the channel restriction to .063". The pic shows the location of the idle air bleed in a Buick 800cfm carb. It is directly above the channel restriction. The idle air bleed in the Buick carb is quite large. And although I had the car idling well for over a year, it was a little finicky. After I plugged the stock idle bleed and drilled a smaller one in the carb top like a Pontiac core, there was a marked improvement in overall idle quality, in and out of gear, less of an rpm drop when shifting into gear, and upon a wing of the throttle, the idle settled down quicker to its normal rpm. Also, I was able to decrease the size of my air bypass a little.
Karl
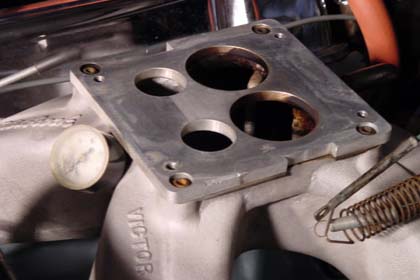
For those who wonder how I went about putting a Qjet on my Victor Dominator. I milled the top of the manifold a bunch, don't remember exactly. Then built this adapter and ported and radiused it to the manifold. With a drop base air cleaner and 3 inch K&N, I have 1/8" clearance under my 64's hood. Karl
Karl:
TinInjun, my thoughts exactly. All fuel that feeds the idle tubes and channel restriction, goes through the jets first. Rochester made removeable and numbered jets and rods. And they made the rods come out of the jets with throttle, and go back in at idle. So it MUST have something to do with idle quality, by design- or they would have just put holes in there, like on the secondaries of a Qjet. Experience has shown me, the jet/rod combo effects idle quality, even with a mild cam and dual-plane intake. The problem is, it also effects WOT main nozzle mixture, also. So the amount of adjustability is limited somewhat. It doesn't make complete sense, as the main jet area is larger than the idle tube area. Logic would dictate the idle tube would control the idle. But opening up the jet area, still removes some restriction, resulting in more fuel to the idle circuit. Now, to adjust idle/off-idle mix ONLY, the idle tubes/channel restriction is obviously the place to go. But that doesn't mean the nozzle drip with a big cam/tunnel ram, will also go away. Opening up the bypass to .125", is just like drilling two .125" holes in your intake, to avoid opening the throttle more. It comes down to, dumping more fuel in the idle circuit, then leaning it out with the bypass air-while at the same time keeping velocity low enough in the primaries, to prevent nozzle drip. Primaries with THREE venturis, designed for high mixture velocity at the slightest touch of the throttle. And don't forget to keep throttle angle low enough, so it doesn't get into the off-idle slot too much. Sheesh !! Karl- don't misread me. I know the mods you show work. I like the changeable bypass plugs- ala Holley aftermarket air bleeds. But I obviously had a "unique" problem. My plenum is big enough to double as an oil drain bucket. Intake ports are 315 cc in heads alone, not counting 6" long runners. I believe there's just not enough air in the primary circuit of a Qjet to idle the engine correctly. But I didn't give up yet-lol- still got a few things to try maybe. I realized, that at some point, it pays to get a Holley. They have less efficient venturis, and 4-corner idling. So the tuner doesn't have to open only 2 small throttle plates to get an idle, creating a lot of velocity. Instead, he opens 4 equal ones a lesser amount, (and avoids nozzle drip and fooling with bypass air.) But the opposite occurs with a Holley, their idle circuit is too rich !! BTW, try taking the jets out of your Qjet/Victor motor like I did. I'd bet money, it'll go richer.
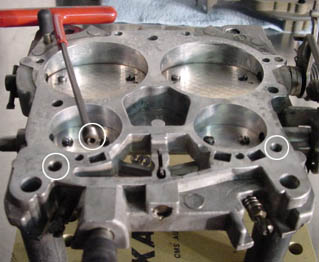
OK guys: I see where you are heading, but I believe you are mistaken, or have more than one problem confusing your issues. Try this analogy. A bucket(the well under the main jets). A 1/4" hole in the bucket(idle jet). A 3/4" low pressure hose filling the bucket.(metering area of rod and jet allowing fuel to enter well(bucket)). In this scenario, the hose is 2.5 times the size of the hole. Much like the ratio of the idle jet metering area vs. the main jet/rod area. The bucket will be continually draining out the hole, but it will still fill up and over flow. This is exactly what would happen in your float bowl if it was not for the needle and seat turning on and off the hose. The idle circuit is not effected by the jet unless other problems are allowing it to be ie., nozzle drip. The only way the jets and rods could effect the idle, is if the idle jet is larger in metering area. The metering rods are not designed to limit fuel at idle, they are for part throttle cruise fuel economy. To change the mixture ratio of WOT to a much leaner ratio for cruise. This is how I get 14 mpg at 3500rpm with a big inch daily driver. When you accelerate, the vacuum in the manifold(which is what the power piston sees) decreases. At the point that the pwr piston spring can overcome the vacuum, the piston rises and lifts the rods out of the jets, increasing the metering area and enrichening the mixture, just like a Holley power valve. When you let off the gas, the pwr piston seats and leans the mixture once again. However, at all times, the metering area is larger than the idle metering area. Now, it is true that if you install a larger jet, or remove the metering rods, you will have a much larger area feeding the main circuit. It is a fact that it takes less pressure to move a given quantity of anything through a larger, rather than smaller, orifice. So, if you have too small a metering rod, or remove them, it will take less of a signal from the venturi to create nozzle drip, because it takes less pressure drop to pull fuel from the float bowl. Zedo: I believe that you are to rich in the main circuit, and it is making it to easy for nozzle drip to occur. I would speculate, that if you put a 72-74 jet in your 800, and a 46-49 metering rod, and walk through the idle correction procedures outlined above again, you would see your nozzle drip problem go away, and begin to notice a significant improvement in idle quality. But your RAV combo with the large plenum may play a role in how successful you become in this situation. This picture shows how you eliminate the idle air bleed from a Buick 800. Then just change the carb top, or drill a .040" or so air bleed in the Buick carb top, and you will see an improvement in idle quality. I have know doubts, that I would idle rich if I removed the metering rods, but it would be from nozzle drip reappearing in my idle. I always run jetting loops at the track, then metering rod loops on the street. My car continues to idle as expected through these procedures, and that goes for my freinds and customers as well. Thats my experience anyway... Karl
Already got it, dude !! I said I had a "few more things to try". The key- make the idle air bypass HUGE !! Here's what I did: Idle air bypass opened up to .227" (anyone ever drill them out that big ??) I basically just made the primary idle circuit, and really the whole carb, a little bigger by doing this. Changed throttle plates to undrilled ones, that was just making it worse. Changed carb top to a '69 Pontiac 428 top, with visibly smaller idle air bleeds. Idle tubes drilled to .068"- the metering end is gone, for all practical purposes. (I bet no one ever drilled them out that big, either-lol) Also, drilled idle discharge ports to .100" 70 jets, still no rods or power piston. Idles at 1000 rpm in Park, 800 rpm in drive, lit up the street tires from an idle. (4000 rpm 9" converter, of course) Idle mix screws at one turn out. Out any more, rich roll. Turn them in, lean roll. Karl, all, thanks for the pics and info. Good show !! This should be an informative thread in the archives. Bye-bye Qjet nozzle drip !! Next- the 1150 Dominator. Have to lean out the idle circuit on that one.
Great info, I should spend more time on this website! I could actually add very little as far as specifics go. One must keep in mind when tuning a q-jet that nearly every carb will be unique in how it is set up from the factory. Also, very, very few units were intended for engines with big cams and a lot of overlap, so nearly every one will need some help when placed in service on a "high performance" engine. Since the airbleeds and jet/rod sizes have a bearing on the fuel delivered to the idle and off idle system, the owner/tuner should test the carb in stock form and go back and make changes to the areas that need help. Nozzle drip is simply not having enough fuel available at whatever the engine vacuum is at idle (at a reasonable throttle opening), the blades are opened up enough to engage the main system. The best approach to curing the problem is to simply open up the baseplate holes, then test the carb. Often times this alone will help and sometimes be enough. If fuel is still insufficient the tubes will need pulled and/or the casting restrictions opened up. An excellent way to test for a lean idle system is to slightly close the choke flap or gently place your hand over the carb with the engine at idle. A speed increase as the amount of incoming air is reduced indicates more fuel is needed. Idle bypass air and/or holes in the plates should be left for custom tuning the throttle blade angle after sufficient fuel is available to the system. If none of the ported vacuum slots/holes are induced and there is no nozzle drip, then extra air is not needed. I would also recomend that all changes be very slight, enlarging tubes or airbleeds only a few thousanths will make huge changes in actual fuel delivery. Going to far will often supply enough fuel to the off idle slots/holes that the idle mixtures screws will no longer have enough control over the idle mixtures, even if fully seated. Zedo: I'm glad you got it to work. I would, however, like to reiterate the fact that your problems are the exception, not the rule. I just got back from the track tonight after testing and tuning a customers car. 68 Firebird Stock early 60's cast iron distributor with pertronix magnetic trigger(non lobe type) 38 degrees total timing 10" 2000 stall Continental converter 3.23 10 bolt posi on 25 inch, very old street tires. 3 inch exhaust out the back with an X-pipe. Babying it out of the hole, to get a 2.03 60ft. She rocketed to an 8.23 1/8th and a 12.76 QTR at 109.1 MPH! This is an easy 12.30 car with slicks, and the motor was easy and cheap to build. This car has only been to the track a couple times. Started at 107 mph and got better with minor tuning of secondary metering rods to aleviate a tip in bog at part throttle, when stepping into the secondaries, and to lean the jetting after we knew we were safely rich. But most important, it idles beautiful, at 750 rpm, in gear, with an only slightly modified stock Qjet. And, using only a stock, out of the box, Carter mech fuel pump. And we outran a number of other Poncho's tonight with substantially more money under the hood. The biggest problem to overcome so far, was teaching my inexperienced freind and customer, how to launch consistently on street tires. It would not surprise me at all, once he gets 3.55 gears, slicks, and a restall of the converter to 2600, if we tune it into the 11.90's. Not bad for a 400 that could be duplicated for low bucks. I'm glad I could help Karl
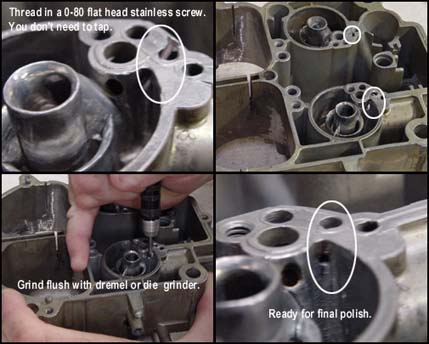
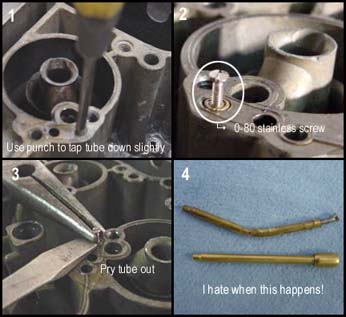
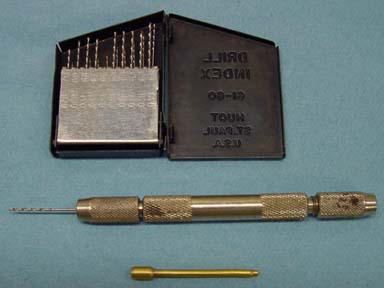
Since I recv'd a couple emails requesting idle down tube removal procedures, here we go: First, always a good idea to use an old rusty Chevy core carb(or any old non Poncho core, usually readily available free from the sheep). To get a couple idle tubes just in case. (see below) Second, spray WD-40 or other penetrant on idle tube and let sit awhile. Third, take a punch, and lightly tap tube into core just a smidgeon...enough to break bond of years of being in the same place. Fourth, spray again and let sit a few minutes. Thread a 0-80 stainless screw into idle tube. You do not need to tap the hole. Only use stainless, most other screws are hardenend, and will break off from stress, rather than bend. And you don't want to break a hardened screw in your idle tube. Should be able to find these screws at a good hardware store, but not your corner market. Fifth, use screw driver and small needle nose or other tool (I have switched to Radio Shack mini dikes since pic was taken, doesn't really matter as long as you can grip well under head of screw). Pry out tube as per pic, occasionally pop right out, but sometimes quite stubborn! 95% come loose without to much trouble. If you have my luck, your first one will pull inner tube such as pic 4. This is why you get a spare tube or two out of a junk carb. It is easy to remove left over pieces with drill bit by hand if this happens. Put small end in drill and lightly sand the large end until it pushes back into core with a light interference fit. Tube does not have to be very tight to do its job, and later removal will be a cinch! Now drill the end of the tube to the desired size. Small drill indexes are available at tool supply shops for $10-$15, usually. Make sure to use a pin vise and drill careful and slow by hand, a couple thou at a time, to get the idle tube to size. Don't break the bit trying to hurry or by forcing the cutting action. The bit, if the right size, should cut easily. (use the shaft of the bits in your index to determine the original size of your idle jet(orifice in end of idle tube)). Now you are ready to reassemble carb and test your idle. Again, all carbs have these same circuits, and can have problems on particular applications. Once you understand what these circuits do...it is not difficult to figure out that Weber, or Holley, or tripower, or... Engineers just chose different approaches to solving fundamentally similar problems. Holleys single biggest advantage over the Qjet, was the ability to design idle and cruise circuits without having to meet emission or drivability requirements of the Government, or of non performance oriented customers for the product(Pontiac cars). A few changes to the idle circuit, an understanding of how all the features of the carb interrelate, and you can tune any carb with the best of them...most important, you will know where all the parts go when you rebuild a carb, not because you took pictures or have built dozens, but because you can see what the engineers were up too. By just looking at the part, you should be able to figure out why it exists, and what it is supposed to do. Karl
The "BP" rods are only .0013" richer than the "CE" rods, which means they basically meter the same during WOT. However, the "CE" has a shorter taper, which will allow more fuel to flow sooner during the transition into the secondaries. This would be the better rod to use for a starting point. Less likelyhood of detonation when first punching the throttle. On the primaries, I would start with the 72,41 combo just to be sure you are a little rich. Then, when everything else is dialed in, and the car is running fine, you could switch to the 44 rod to see if you notice a difference. Once you move to the 44 rod, rev the engine to a constant 2500 rpm in park...if you don't hear any light missfires, everything should be fine. If the engine doesn't purr smoothly, disconnect the vacuum advance and see if the miss goes away, if it does, then you have to decide if you have to much vacuum adv. or if it is to lean. Drive the car w/o the adv. connected, if it runs out good with no misses on the highway, and good throttle response, then you need to limit your adv. canister. If the throttle isn't as responsive, or you still feel a lean miss, then you need a smaller metering rod. This is assuming that your initial timing and total advance are properly set. Always get the distributor right before tuning on the carb, or you will make decisions based on misinformation. Karl
The choke pull-off, once the car is warmed up, acts as a balance for the secondary air valve spring. If your choke pull-off is to fast, then it will take substantial spring tension to keep from a stumble, as you have found.
With the engine off, seat the choke pull-off linkage with your finger, then release and watch how fast it extends. It should be in the 1-2 second range, maybe even three. If it just pops right out, or is very quick, then you might need to replace it with a slower one. If it is slow, you might need to play with secondary rod hangers, or rod taper to change the fuel curve.
Karl
|